
| View unanswered posts | View active topics |
It is currently Sun May 19, 2024 11:20 am |
|
All times are UTC - 5 hours [ DST ] |
"The Project" - Begins
Moderator: Moderators
|
|
Page 11 of 13 |
[ 191 posts ] | Go to page Previous 1 ... 8, 9, 10, 11, 12, 13 Next |
| Print view | Previous topic | Next topic |
"The Project" - Begins
| Author | Message |
|---|---|
|
Forum Moderator
Joined: Sat Jun 02, 2007 4:39 pm Posts: 2433 Location: In the Garage |
FINALLY put the engine stand together and got the engine mounted for reassembly. Will start next weekend.
 More parts prep... Degreased and sanded the motor brackets. Then hit em with a few coats of bedliner. I know I won't see these brackets, but since I'm coating most of the undercarriage, might as well do these as well. Also soaked the bolts and washers in some CLR for a few hours to remove the rust.  Had an idea to repaint the hood hinges with some cans of Duplicolor Metalcast I had laying around. Time to try the paint effect on the hinges. Not quite a black chrome effect...looks more like a pewter. Applied the grey base then the dark chrome top coat. Will do for now, but next year will take the hinges to the powdercoater and go with a flat black. Before   After...Smoke Anondized or Pewter??   _________________  Just rolling with the dog pound... |
| Sun Apr 28, 2013 5:29 pm |
|
|
CCFBG Club Member 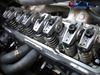 Joined: Thu Jul 05, 2007 5:32 am Posts: 1508 Location: Miserysauga , Ontario |
Coming along there Bill now get it done so we can go for a cruise
|
| Sun Apr 28, 2013 8:05 pm |
|
|
Forum Moderator
Joined: Sat Jun 02, 2007 4:39 pm Posts: 2433 Location: In the Garage |
ENGINE REBUILDING HAS BEGUN
Engine Flush Time....Pulled the old engine plugs to have a look inside and decided it badly needed an engine flush. Went old school with some CLR in a spray gun and the water hose. NOW, its nice and clean with new Melling freeze plugs installed. Also, applied some engine oil to the cyclinder walls and turned the engine over by hand a few time to lubricate.  Heads Done....Finished installing the posi valve seals, added some shims and installed the Comp Cams beehive springs on the exhaust side. Also, cleaned off the old head bolt sealant and put a steel wire to the threads. Installed thin gaskets and torqued the head bolts to 65 ft/lbs. Always a good ides to double check each bolt after torquing them down. Can never be too careful. PROOF I WORK ON MY ENGINE!!!  Taped up all the holes, and hit the block with some metallic engine enamel. Reinstalled the motor mounts and put a cover over the engine. Next week...mounting the engine to the k-member....fingers crossed.   _________________ Just rolling with the dog pound... |
| Sun May 19, 2013 7:51 pm |
|
|
Forum Moderator  Joined: Thu Mar 17, 2005 10:28 pm Posts: 5900 Location: Center of the Universe |
I cant find the "Like" botton
_________________ http://forums.kwmuscle.com/viewtopic.php?t=4238&start=0 Laughing at dumb dumbs since Oct 03/11 Alex IROC Z-28 wrote: Ohhh lord....here we go..... Hawk one time kicked Chuck Noris ass so bad that Chuck Noris filed for Workers Comp......  |
| Sun May 19, 2013 9:53 pm |
|
|
Forum Moderator
Joined: Sat Jun 02, 2007 4:39 pm Posts: 2433 Location: In the Garage |
Engine and parts mock up today.
Close up of the posi valve seals and Comp Cams beehive springs.  Drilled out the spot rivets on the engine mounts, sanded down and painted the mounts , then installed the Energy Suspension bushings.   Installed the powder-coated accessory brackets and starter. Starter needed little grinding to get it just right. When installing the K-member, best not to fully tighten the engine mounts. You might need a hammer and pry bar to install the main bolts. Loosely fitted the headers and pipes to see how they would fit and look at the clearance. Need to see if there is enough room to mount the AIR module between the oil pan and headers. Want to move the module from the top of the motor to the bottom and clean things up. Thinking of using some high temp braided hosing from a Cadillac so the tubes don't melt from the header heat.    _________________ Just rolling with the dog pound... |
| Mon May 27, 2013 1:51 am |
|
|
CCFBG Club Member Joined: Tue Aug 08, 2006 11:47 pm Posts: 287 Location: Alliston |
Looks real good Bill!
_________________ If she's bored, she should've been stroked.  91 305-World Class T5-Pro5.0 shifter-95 rear end with 3.23's-2002 C5 rims-manifolds and y-pipe from a Player's cup car-flowmaster and custom tailpipes-custom stereo. 91 305-World Class T5-Pro5.0 shifter-95 rear end with 3.23's-2002 C5 rims-manifolds and y-pipe from a Player's cup car-flowmaster and custom tailpipes-custom stereo. |
| Mon May 27, 2013 9:55 pm |
|
|
Forum Moderator
Joined: Sat Jun 02, 2007 4:39 pm Posts: 2433 Location: In the Garage |
Started working on relocating the A.I.R. pump. Originally was going to move to near the battery but came up with a better idea.
All it took was cutting the back of the tubing, then adding some new tubing, make a few bends, have a coffee I will be running the tubing from the headers and A.I.R. pump thru the back of the motor with copper fittings and tubing. Here are the pics....Before  Making the tubing, fittings and brackets     DONE...just have to paint the tubing with some hi-heat silver paint.  _________________ Just rolling with the dog pound... |
| Sun Jun 09, 2013 9:40 pm |
|
|
CCFBG Club Member Joined: Thu Jul 05, 2007 5:32 am Posts: 1508 Location: Miserysauga , Ontario |
as long as the dipstick fits your good to go. Now get it in the car
|
| Mon Jun 10, 2013 1:58 am |
|
|
Forum Moderator
Joined: Sat Jun 02, 2007 4:39 pm Posts: 2433 Location: In the Garage |
Putting the engine harness in place and lengthening some of the sensors for the AIR pump, charcoal canister and a few others that will be modified in the next few weeks. Thankfully , I kept the old engine harness so extra correct wires are no problem.
Also need a visual to see how to hide and rework as much of the harness as possible. All part of trying to clean up the look a bit.     _________________ Just rolling with the dog pound... |
| Sun Jun 16, 2013 2:34 am |
|
|
Forum Moderator
Joined: Sat Jun 02, 2007 4:39 pm Posts: 2433 Location: In the Garage |
Started working on the front of the engine yesterday. Would have gotten further but forgot the bracket bolts. Also decided to go with a new water pump just to make things easier.
3rd gen fuel tank just wasn't cutting it so I went out and picked up a 4th gen tank and fitted with new Racetronix fuel pump and Racetronix wiring harness. Will utilize the 4th gen charcoal canister which will eliminate the factory canister and clean up the engine bay even more. Fuel neck was modified (lengthened) with some Aeroquip fuel hose to help fit the 3rd gen gas opening. Also picked up some new tank straps which I covered with bed liner to prevent rusting.    Modified the stock coil holder to accept the MSD coil and keep the original height. Just grind the spot welds, separate the holder, notch the metal bracket to accept the MSD coil, then paint the holder and reassemble.   _________________ Just rolling with the dog pound... |
| Sun Jul 21, 2013 7:18 pm |
|
|
Forum Moderator
Joined: Sat Jun 02, 2007 4:39 pm Posts: 2433 Location: In the Garage |
So this was the plan…install the Comp Cams screw-in studs, CM rods and Magnum roller rockers. We put everything together and then discovered there was a LOT of space between the rods and rockers. At first I thought I had dropped a lifter but then realized that ALL the rockers had space. Checked the Com Cams website to see if I bought the wrong parts. YUP…all parts were correct. Quick call to Comp Cams helpline and discovered that since we went to screw in studs, we need to shave the stud boss down the height of the base of the stud (DOH!!).
Before the problem……they look SO GOOD  So…I had two options; A) remove and strip the head, send out to machine shop, reassemble head. B) Buy a Comp Cams stud boss cutter and do it myself. Went with "B". Called Performance Improvements and found out cutter is special order and the sales rep has NEVER sold a cutter EVER!!! Guess not a lot of people are DIY guys or don’t install screw in studs on stock iron heads. Beginning the shave the boss down. Had to remove about 1/8” of material. Used the cordless drill on slow speed and kept measuring. Also had to extend all the stud threads as I didn’t go deep enough originally.  Install complete…they look GREAT now. Too bad I’ll never see them again…hopefully. Lots of Clevite assembly lube used and turned each cyclinder by hand to ensure rockers were tightened at top-dead-centre. Lock nuts were hand tightened then given a 3\4 turn and jam nuts tightened as well.  Went to install the valve covers and found out they didn't want to fit. Seems the baffle and centre bolt supports don't like the Comp rockers. A bit of grinding and putting the pliers to the baffle and they now fit. Just a great way to end two week ends of work. Decided to go with a new water pump to avoid any headaches. As I was buying a new aluminum rad, it seemed like a no brainer. Water pump painted and front pulleys installed. Starting to come together.  New Mishimoto rad….LOTS of BLING!! Will run with 4th gen fans to keep everything COOL.  _________________ Just rolling with the dog pound... |
| Sun Aug 18, 2013 8:56 pm |
|
|
CCFBG Club Member  Joined: Tue Feb 28, 2006 1:42 pm Posts: 2739 Location: Mississauga |
Looks good Bill!
I hope you dont have any issues with the way you set your valve lash. I've never had 3/4 turn past ZERO lash work out for me. I always go kinda between 1/4 and 1/2 on a roller motor. Whens the expected test drive? _________________ 2012 Camaro 2SS/RS - LS3/TR6060: BTR Cam, Long Tubes, 3" Catback, UDP, CAI Intake, Air Scoop, 3.91 Gears, Poly Diff Bushings, Toe Arms, Poly Subframe, Poly Radius-Rod bushings, ZL1 Suede Shifter, ZL1 Mounts, Arun Tuned - 475rwhp 443rwtq 11.97 @ 116 w/ 1.85 60' Listen To Song Of My People! |
| Mon Aug 19, 2013 9:11 am |
|
|
Forum Moderator
Joined: Sat Jun 02, 2007 4:39 pm Posts: 2433 Location: In the Garage |
A realistic drive date will probably be mid October. Lets hope for an indian summer.
_________________ Just rolling with the dog pound... |
| Mon Aug 19, 2013 5:52 pm |
|
|
Forum Moderator
Joined: Sat Jun 02, 2007 4:39 pm Posts: 2433 Location: In the Garage |
Sent my fuel rail to Arkansas Polishing to get polished and have the lines Powder coated. The powder color is very close to that of the value covers color so should like killer when installed. Two thumbs up for Arkansas Polishing, this guy does some nice work.
Before Pics...some alum pitting   Polished and Powder Coated   New Bosch 22 lb Injectors and a few other new items waiting to be installed  _________________ Just rolling with the dog pound... |
| Sun Nov 17, 2013 12:36 pm |
|
|
CCFBG Club Member  Joined: Sat Mar 19, 2005 8:07 pm Posts: 4327 Location: The big town |
skinny z wrote: Daz wrote: It happened to me with the stock lifter. Think of a shock not fast enough in compressing/decompressing. Killed a lifter first then a cam..05-305-8 cam from Comp Cams and yes also used too tight of a spring for the hydraulic lifters and cam thats recommended by them. Killled the lifter then the cam. They ended up replacing the cam. IMO springs has to match the springs in its ENTIRE RPM range.BTW gained 5mph and the valvetrain got quieter. This was a 383 with a Superram so Im in the 5500-6500 RPM range That's an excellent example of what can go wrong. In my case, we had built a new ZZZ Chevy short block into a Brodix headed, 290 degree cammed 7000 rpm screamer. The valve guides went away in a few thousand k. Figured it was a poorly set up valve train ( springs, installed height, etc) it was rebuilt with new springs, checked all the specs and that well engineered valve train pounded out the guides in a couple thousand kms. That's two sets of guides in just a few thousand k. Lesson learned. To sum up, I installed the Comp short travel toolsteel lifters and we went from a dismal 13+ something (edit) to a best of 12.4. I would have went threw some mechanical rollers on it by that time and called it a day. _________________  9.06@155 mph, small block pump gas with 3.42's bird 8.14@166 mph, big block on 250 shot monza |
| Sun Dec 15, 2013 9:59 am |
|

|
|
Page 11 of 13 |
[ 191 posts ] | Go to page Previous 1 ... 8, 9, 10, 11, 12, 13 Next |
|
All times are UTC - 5 hours [ DST ] |
Who is online |
Users browsing this forum: No registered users and 2 guests |
| You cannot post new topics in this forum You cannot reply to topics in this forum You cannot edit your posts in this forum You cannot delete your posts in this forum You cannot post attachments in this forum |